As an Amazon Associate, we earn from qualifying purchases. Some links on this site are affiliate links at no extra cost to you. Our recommendations are based on thorough research and editorial judgment.
The 3 Best Studio Monitor EQs for Perfecting Your Sound Setup
Looking to perfect your sound setup? Check out the KALI AUDIO LP-UNF, which boasts a 4.5-inch woofer for amazing bass down to 39 Hz! Pair it with the PreSonus Eris E7 XT for deep lows and clear highs, thanks to its 6.55-inch driver. Don’t forget some Studio Monitor Isolation Pads to absorb vibrations, making your mixing experience even better! 🎶 Each element plays a role, and there’s more to uncover about EQ choices—stick around!
Key Takeaways
- Choose studio monitors with a frequency response range around 40 Hz to 20 kHz for balanced sound reproduction across lows, mids, and highs.
- Look for monitors with a flat response to ensure accurate audio reproduction during mixing and production.
- Select monitors with low-frequency response under 40 Hz for heavy bass genres, enhancing overall sound quality.
- Consider amplifier power ratings that match monitor sensitivity to maximize performance and minimize distortion.
- Utilize adjustable acoustic tuning controls for customization based on your specific studio environment and listening preferences.
KALI AUDIO LP-UNF Ultra Nearfield Powered Monitor System

KALI AUDIO LP-UNF Ultra Nearfield Monitor System - Black
- Touch-sensitive Volume Slider - Black (Pair)
- 4.5" Powered Studio Monits with 1" Tweeter
- Bluetooth Connectivity
If you’re in the market for studio monitors that won’t break the bank but deliver fantastic sound, the KALI AUDIO LP-UNF Ultra Nearfield Powered Monitor System could be your perfect match! 🎶 With its impressive 4.5-inch woofer that reaches down to 39 Hz, this monitor guarantees you catch every bass note and nuanced detail in your mixes.
Exceptional Technology
It’s designed using tech from Kali’s LP-6 and LP-8 V2 speakers, ensuring quality you can trust.
Connectivity Galore
With USB-C, TRS, and RCA inputs, you’ve got versatile connectivity for any setup.
Sleek Design
Available in sleek black and sold as a pair, it’s an audio upgrade you won’t regret!
You may be interested

Best For: Those seeking an affordable yet high-quality monitor system for mixing, recording, and audio production.
Pros:
- Exceptional bass response down to 39 Hz for detailed low-end performance.
- Versatile connectivity options including USB-C, TRS, and RCA inputs.
- Sleek design and sold as a pair for a comprehensive audio setup.
Cons:
- Limited to a 4-inch woofer size, which may not be ideal for very large spaces.
- Frequency response may not satisfy audiophiles looking for extreme accuracy.
- Bluetooth functionality may not meet the needs of those preferring wired connections for critical listening.
Studio Monitor Isolation Pads for 5 Inch Monitors (2 Pack)
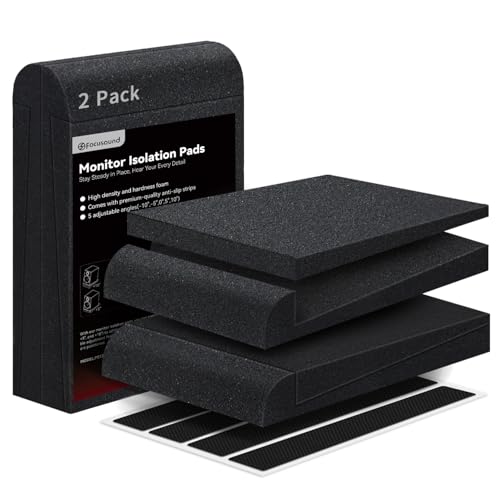
Focusound Studio Monitor Isolation pads for 5 Inches Monitors, 2 Pack High Density Acoustic Speaker...
- Vibration Absorption: Your downstairs neighbor will thank you! Monitor isolation pads reduce vibrations, helps eliminate unnecessary audio resonance, and delivers optimal...
- Multiple Options of Angle Adjustment: Our monitor isolation pads for monitors are offered 5 angle Adjustment. You can easily adjust the angle of your speakers...
- Anti-Slip Bottom Design: Silicone anti-slip pads on the bottom help keep the speaker safe and stable.
When it comes to getting the most out of your 5-inch studio monitors, the Studio Monitor Isolation Pads are a must-have accessory! These high-density acoustic foam pads absorb vibrations, ensuring your audio performance is exceptional.
Key Features:
- Dimensions: 12.04 x 7.68 x 3.34 inches
- Weight: 7.7 ounces
- Angles: Adjustable at 0°, -5°, -10°, +5°, +10° for ideal sound projection
You’ll love how they enhance clarity and reduce unwanted resonance, making recording and mixing a breeze! Plus, the anti-slip bottom keeps everything in place. With a solid customer rating of 4.6 stars, they’re a winning choice! 🎧
Best For: Professionals and enthusiasts looking to optimize audio performance from 5-inch studio monitors.
Pros:
- Enhances sound clarity and reduces unwanted vibrations for a superior audio experience.
- Adjustable angles allow for personalized sound projection to suit different listening preferences.
- Anti-slip bottom design ensures stability and safety of the monitors during use.
Cons:
- Some users have reported construction quality issues with the anti-slip pads.
- The foam material may wear over time under heavy use.
- May not fit all monitor models perfectly despite versatile compatibility.
PreSonus Eris E7 XT Active Studio Monitor
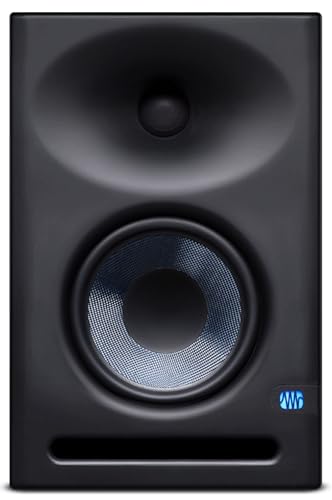
PreSonus Eris E7 XT 2-Way Active Studio Monitor with EBM Waveguide (Pack of 1)
- 6.55-inch woven composite low-frequency transducer gives deep lows.
- 1.25-inch (32 mm), ultra-low-mass, silk-dome, high-frequency transducer provides smooth highs.
- Now comes included with Studio One Prime and Studio Magic plug-in suite, over $1000 USD worth of music production software.
For music producers and audio engineers seeking high-quality sound without breaking the bank, the PreSonus Eris E7 XT Active Studio Monitor stands out as an excellent choice! Its 6.55-inch low-frequency driver delivers deep bass, while the 1.25-inch silk-dome tweeter provides crisp highs.
Features You’ll Love:
- Power Output: 130 watts to energize your workspace.
- Frequency Response: Wide range without muddiness, perfect for mixing.
- Size: Just right at 11.5D x 9.8W x 16H inches.
Plus, the customizable acoustic tuning controls let you tailor the sound to your environment. 🎶 Why wait? Let’s get mixing!
Best For: Music producers and audio engineers looking for high-quality, budget-friendly studio monitors that deliver exceptional sound performance.
Pros:
- Excellent build quality and sound, rated 4.6 out of 5 stars by users.
- Deep bass response from the 6.55-inch driver, making it suitable for mixing and production.
- Customizable acoustic tuning controls allow for tailored sound to fit any environment.
Cons:
- Some users may experience initial sound issues that require calibration to resolve.
- Not water-resistant, which limits placement options in humid environments.
- The weight of only 1 pound may not be ideal for all studio setups or stability preferences.
Factors to Consider When Choosing Studio Monitor Eq

When you’re choosing a studio monitor EQ, there are some key factors you’ll want to keep in mind. Consider the frequency response range and amplifier power rating, as these can greatly impact your sound quality. Don’t forget about input connectivity options, acoustic control features, and build quality, because trust me, you’ll want something durable for all those late-night mixing sessions! 🎶
Frequency Response Range
Choosing the right frequency response range for your studio monitors can feel overwhelming, but it doesn’t have to be! Start by understanding that the frequency response tells you the range of audio frequencies your monitors can reproduce, measured in Hertz (Hz). Ideally, you’ll want a range around 40 Hz to 20 kHz for balanced sound. A wider frequency response offers better clarity across lows, mids, and highs. Monitors with a flat response are essential because they serve audio as is—no frills! And if you’re into genres with heavy bass, look for monitors that dip below 40 Hz. Trust us, your low-end sounds will thank you! 🎶 Keep these factors in mind for your best studio setup!
Amplifier Power Rating
But remember to match the power rating with the monitor’s sensitivity, often expressed in dB. For larger rooms, you’ll need monitors with higher power ratings to fill the space, while smaller rooms can get by with less. Just be cautious—too much power can damage your speakers! 🛑 Choosing the right rating based on your environment will guarantee you achieve clarity and precision in your sound setup. Happy mixing!
Input Connectivity Options
After you’ve nailed down the right amplifier power rating for your studio monitors, it’s time to think about how you’ll connect everything. Input connectivity options can make or break your setup! Look for versatile options like USB-C, TRS, and RCA to link various devices like desktops, laptops, and audio interfaces. Balanced inputs, especially TRS, help minimize noise and interference, enhancing sound quality considerably.
Consider wireless capabilities, too! Monitors with Bluetooth support let you stream audio effortlessly from your devices. Finally, evaluate the ease of use; user-friendly access to ports makes your workflow smoother, whether you’re recording or mixing. So, keep connectivity in mind, and you’ll create a more efficient and enjoyable sound experience! 🎶
Acoustic Control Features
When setting up your studio monitors, it’s essential to take into account their acoustic control features to guarantee you get the best sound in your environment. Look for adjustable tuning controls like level, high-pass filters (HPF), and low/high-frequency trims. These let you customize your monitors to fit your space perfectly!
Don’t forget monitor isolation pads—they help cut vibrations and boost clarity. High-density acoustic foam in these pads absorbs unwanted noise, maintaining accurate sound reproduction. A waveguide design in monitors widens the sweet spot and enhances sound dispersion, making your mixes come alive from various listening positions. Remember, it’s all about tuning your setup for that sweet sonic harmony! 🎶
Build Quality and Durability
Choosing the right studio monitor means considering the build quality and durability, as they can make a world of difference in your audio experience. Look for materials like vinyl-laminated medium-density fiberboard; they’re tough and resist wear! A solid design enhances stability with anti-slip pads and dense foam construction, reducing vibrations—key for clean sound. Monitors that support significant weights usually indicate a robust build, perfect for those long sessions. Don’t overlook components, either; woven composite drivers and silk-dome tweeters guarantee consistent performance. And hey, regular calibration and break-in periods help maintain your monitors’ integrity, keeping wear-and-tear sound issues in check! Remember, durable monitors are your sound setup’s best friends! 🎶
Frequently Asked Questions
What Are the Benefits of Using an EQ With Studio Monitors?
Ever thought about how much fun it is to wrestle with sound? Using an EQ with studio monitors lets you tame that wild beast! 🎶 You can adjust frequencies, enhance clarity, and refine bass response. This way, your mixes translate better on various playback systems. You’ll hear that missing sparkle or mud, and tweak it! Plus, it makes you feel like a sonic wizard. Who doesn’t want that? Control your sound, and release your creativity! 🌟
How Do I Install Studio Monitor EQS in My Setup?
To install studio monitor EQs in your setup, follow these steps:
- Connect your monitors: Plug them into your audio interface or mixer.
- Choose your EQ: Select a hardware or software EQ that suits your needs.
- Route the signal: For software, set it in your DAW’s effects chain. For hardware, connect it between your mixer and monitors.
Now, tweak those frequencies! 🎶 Enjoy that sweet sound! You’re one step closer to audio perfection.
Can Studio Monitors Function Without an EQ?
Sure, studio monitors can work without an EQ! They’re designed to deliver sound accurately, so you can enjoy great audio quality right out of the box. However, without EQ, you might miss some low-end thump or high-end sparkle. Think of EQ as your trusty sidekick! Adding it can help tailor frequencies to your space, ensuring every mix you create sounds just right. 🎶 So, why not give EQ a shot when you’re ready?
What Size Studio Monitors Work Best With EQS?
When you’re choosing studio monitors, size matters! Generally, you’ll want 5 to 8-inch woofers for balanced bass and clear highs. Smaller monitors, like 3-4 inches, might lack low-end depth, but they’re great for tight spaces. Larger monitors (10 inches+) provide powerful sound but may overwhelm smaller rooms. Pairing with an EQ makes all sizes sing, helping you fine-tune frequencies for your unique setup. So, find your fit for fantastic fidelity! 🎵✨
How Do Room Acoustics Affect Studio Monitor EQ Performance?
Room acoustics really shake things up when it comes to your studio monitor EQ performance! You see, sound waves bounce off walls, floors, and ceilings, creating peaks and dips in your audio. To tame those reflections, you’ll need acoustic treatment—think foam panels or bass traps. Properly adjusting your EQ can help you flatten that response, ensuring your mixes translate well. So, don’t let your room get the best of you! 🎶