As an Amazon Associate, we earn from qualifying purchases. Some links on this site are affiliate links at no extra cost to you. Our recommendations are based on thorough research and editorial judgment.
3 Best Audio Interfaces With Reamp Output for Professional Sound Quality
Looking for the best audio interfaces with reamp output for professional sound quality? Check out the XTUGA USB Audio Interface, offering 48V phantom power and studio-grade recording at 16-bit/48 kHz. The Focusrite Scarlett Solo 3rd Gen shines with its Air Mode and 24-bit/192 kHz capabilities, perfect for enhanced clarity! Finally, the compact PreSonus AudioBox GO gives you USB-C power and 24-bit/96 kHz recording. Ready to enhance your sound game? Let’s keep exploring these options! 🎤✨
Key Takeaways
- The XTUGA USB Audio Interface offers 48V phantom power and studio-grade recording at 16-bit/48 kHz, ideal for professional sound quality.
- Focusrite Scarlett Solo 3rd Gen features Air Mode and supports 24-bit/192 kHz recording, enhancing clarity and brightness in recordings.
- The PreSonus AudioBox GO provides portability with USB-C power and supports up to 24-bit/96 kHz recording, making it versatile for on-the-go sessions.
- When choosing an interface, prioritize reamp output functionality and audio quality specifications like bit depth and sample rate for optimal sound.
- Interfaces should have high-performance converters and low-noise outputs to ensure professional-grade audio capture and playback.
XTUGA USB Audio Interface for PC

XTUGA USB Audio Interface for PC,Interface for Recording Music Computer Recording Audio Interface...
- [Reliable Dual Inputs for Daily Use] This Q-12 audio interface provides professional 16-Bit/48kHz resolution for pristine sound. Unlike others with popping noise, our...
- [48V Phantom Power & Zero Latency] Capable of driving condenser mics with switchable 48V power. Say goodbye to high latency; this xlr interface features fast transmission...
- [Plug and Play] Functioning as a stable audio interface for PC via USB connection. Powered directly from your computer, no external adapter needed. Simply plug in and...
Impressive Features
- Connectivity: You get a microphone preamp with a standard 3-pin XLR socket, plus a 3.5mm jack.
- Phantom Power: It supports 48V phantom power, essential for high-quality microphones.
Top Performance
- Sound Quality: Enjoy studio-grade recording, mixing, and playback at 16-bit/48 kHz.
- Volume Control: Independent volume for each channel guarantees customized mixing.
You may be interested


With the XTUGA, finding that perfect sound is a piece of cake! 🎶
Best For: The XTUGA USB Audio Interface is best for beginners and professionals looking to achieve high-quality recordings with user-friendly, plug-and-play functionality.
Pros:
- Ultra-low latency ensures real-time monitoring and instant feedback during recording.
- Phantom power support accommodates a wide range of professional microphones for optimal sound quality.
- Compact and portable design makes it easy to set up and use in various environments.
Cons:
- Limited to 16-bit/48 kHz recording may not meet the demands of audiophile-level professionals.
- Gain halo meter may require adjustment expertise to avoid clipping.
- Only two channels available may restrict larger recording setups or multi-instrument recordings.
Focusrite Scarlett Solo 3rd Gen USB Audio Interface
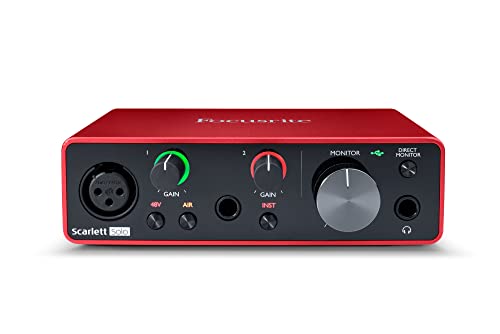
Focusrite Scarlett Solo 3rd Gen USB Audio Interface for Guitarists, Vocalists, Podcasters or...
- Pro performance with great pre-amps - Achieve a brighter recording thanks to the high performing mic pre-amps of the Scarlett 3rd Gen. A switchable Air mode will add...
- Get the perfect guitar and vocal take with - With two high-headroom instrument inputs to plug in your guitar or bass so that they shine through. Capture your voice and...
- Studio quality recording for your music & podcasts - Achieve pro sounding recordings with Scarlett 3rd Gen’s high-performance converters enabling you to record and mix...
The Focusrite Scarlett Solo 3rd Gen USB Audio Interface is a fantastic choice for anyone serious about recording high-quality audio, whether you’re a guitarist, vocalist, or podcaster. Its compact size (1.71 x 5.65 x 3.77 inches) and lightweight design (1.1 pounds) makes it perfect for any desk setup.
Key Features
- Mic Pre-Amps: Get brighter recordings with high-performing pre-amps.
- Air Mode: Switch it on for extra clarity!
- 24-bit/192kHz Recording: Experience studio-quality sound.
- Low-Latency Monitoring: Record smoothly in real time.
With Pro Tools Intro+, you’re ready to start creating right away. 🎶
Best For: The Focusrite Scarlett Solo 3rd Gen USB Audio Interface is best for guitarists, vocalists, podcasters, and producers looking for high-quality audio recording.
Pros:
- High-quality recordings with studio-grade 24-bit/192kHz audio.
- User-friendly setup with plug-and-play functionality and included software.
- Compact and lightweight design perfect for any workspace.
Cons:
- No MIDI input which may limit some users.
- Phantom power activation needed for condenser mics, adding an extra step.
- Some users experience minor latency and overheating during prolonged use.
PreSonus AudioBox GO USB-C Audio Interface

PreSonus AudioBox GO | USB-C Audio Interface for music production with Studio One DAW Recording...
- Ultra-affordable: ultra-compact, versatile USB-C audio interface for home and mobile recording with professional sound quality.
- Recording Software included: Get started right away with Studio One Prime DAW recording software and Studio Magic software bundle including music tutorials, tons of sound...
- Bus-Powered: AudioBox GO is powered by your connected USB-C device so no need for an additional power supply – works great with both Apple and Android devices.
If you’re a musician on the go, the PreSonus AudioBox GO USB-C Audio Interface is tailor-made for your creative lifestyle! This ultra-compact interface boasts professional sound quality without breaking the bank. You can power it directly from your USB-C device—no extra power supply needed!
Key Features:
- Inputs: 1 TS instrument input, 1 XLR mic/line combo input
- Outputs: 1 TRS 1/4” headphone output, 2 balanced TRS 1/4” main outputs
- Audio Quality: Up to 24-bit/96 kHz recording, studio-grade converters
Plus, it includes Studio One Prime DAW and the Studio Magic bundle! 🎶 Get ready to record!
Best For: Musicians and podcasters looking for an affordable, portable audio interface with high-quality sound for home or on-the-go recording.
Pros:
- Cost-effective: Ultra-affordable price point makes it accessible for beginners.
- Compact design: Lightweight and portable, perfect for travel and mobile setups.
- Quality software bundle: Comes with Studio One Prime DAW and Studio Magic, offering immediate access to music production tools.
Cons:
- Limited inputs: Only one mic input and one instrument input may not suffice for larger recording setups.
- No MIDI support: Lacks MIDI connectivity, which may be a drawback for users needing to integrate MIDI equipment.
- Buss-powered only: Doesn’t function independently, relying solely on USB-C power, which may be limiting in some situations.
Factors to Consider When Choosing an Audio Interface With Reamp Output
When you’re picking an audio interface with reamp output, you’ve got some key factors to evaluate! First up, check the reamp output functionality—it should seamlessly integrate with your setup for cooler sound possibilities. You also want to look at audio quality specifications, input and output options, device compatibility features, and what software comes bundled with it; these elements can make a huge difference in your recording experience! 🎶
Reamp Output Functionality
Choosing an audio interface with reamp output functionality can transform your recording experience, especially if you love tweaking and experimenting with sound! This feature lets you send pre-recorded audio back through an amp or effects chain. It’s perfect for guitarists and producers who want to refine their sound without re-recording!
When you look for an interface, check if it includes a dedicated reamp output to streamline those processes. Typically, these outputs are balanced or unbalanced line-level, so compatibility with your gear is essential. Using a reamp output can breathe new life into your mixes, adding dynamic and versatile elements. Get ready to sculpt your sound like a pro! 🎸🎶
Audio Quality Specifications
Understanding audio quality specifications is key to getting the most out of your recordings, especially if you’re integrating reamp output functionality into your setup. Here are some essential factors to evaluate:
- Bit Depth and Sample Rate: Aim for 24-bit/192 kHz. These specifications offer superb dynamic range and clarity!
- High-Performance Converters: Look for interfaces with superior converters to guarantee studio-quality recordings.
- Low-Noise Outputs: Balanced outputs help reduce unwanted noise, keeping your audio crystal clear.
- Gain Control Features: Independent volume adjustments and gain halo meters let you monitor levels without distortion.
- Phantom Power (48V): Essential for condenser mics, phantom power helps you access peak sound quality! 🎤
Input and Output Options
Selecting the right input and output options for your audio interface is essential if you want to maximize your recording potential!
Start by checking for multiple input options. XLR combo jacks are a must for connecting microphones and line-level instruments. This flexibility lets you tackle any recording situation. Next, balanced and unbalanced outputs? Absolutely necessary! They allow connections to various speakers, giving you sound options.
Don’t forget dedicated instrument inputs, specifically tuned for high-headroom signals from guitars and basses, preventing pesky clipping. A headphone output with mix control is also critical for zero-latency monitoring—nobody enjoys pesky delays! Finally, make sure the interface supports high-quality audio formats like 24-bit/96 kHz for that professional audio magic. 🎶
Device Compatibility Features
When diving into the world of audio interfaces, you’ll want to keep a few key factors in mind to guarantee compatibility with your setup! First up, make sure your audio interface plays nice with your operating system—whether it’s Windows or macOS. You don’t want to deal with tech hiccups!
Next, check the USB connectivity options. USB-C or USB 2.0 can make a difference in connecting with various computers and mobile devices. Also, confirm that it supports the inputs and outputs you need, like XLR for your mics and TRS for instruments. Finally, consider if you want a bus-powered device for portability or an external power supply for a more stationary setup. Happy recording! 🎶
Software Included Package
Many audio interfaces include popular Digital Audio Workstations (DAWs) and essential recording tools, so you can get started right away. You’ll likely find music tutorials, sound samples, and virtual instruments in the mix, which can boost your learning and creativity.
But, keep an eye on the quality and diversity of included software—this can make a big difference in achieving professional-sounding recordings. Additionally, make sure the software is compatible with your operating system to avoid headaches. Some interfaces even throw in effects and mastering tools, so you can expand your production capabilities beyond basic recording. Now, that’s nice! 🎉
Portability and Size
Portability and size can make or break your audio interface experience! When choosing an interface, consider its dimensions and weight. Compact models are typically easier to transport, perfect for mobile recordings or live shows. A lightweight design fits snugly in your laptop bag without weighing you down.
Look for bus-powered options, too—this means less gear to haul around! 🌍
Don’t forget about rugged build quality; you want an interface that can handle your travels and diverse workspaces. Finally, check the dimensions to make sure it doesn’t hog your desk or luggage space. With the right size and portability, you’ll set yourself up for successful recording adventures! 🎤
Price Point Considerations
Choosing the right audio interface is about more than just portability and size; the price point plays a big role too! You’ll find options ranging from $50 for basic models to over $500 for professional-grade devices. Budget-friendly interfaces offer essential features, but may miss out on high-quality preamps and robust connectivity.
Mid-range models balance price and performance, providing better audio quality, more inputs/outputs, and extra software. High-end interfaces focus on superior audio quality, advanced features like reamp outputs, and durable build quality.
When you consider price, think long-term! Assess factors like durability and included software, since a higher initial investment can save you cash down the road. 🎤💵
Frequently Asked Questions
What Is Reamping and How Does It Work?
Reamping is a fantastic way to reintroduce an already-recorded audio track back into an amp or effects processor. You send the dry signal from your interface through a reamp box, converting the line level back to instrument level. This lets you sculpt the tone with various amps and pedals, bringing new life to your recordings! Enjoy tweaking those sounds until everything sparkles. 🎸 It’s like giving your music a glow-up!
Can I Use an Audio Interface Without Reamp Output?
Absolutely, you can use an audio interface without a reamp output! While reamping‘s cool for sending your signal back through pedals or amps, it’s not essential. Most interfaces have standard outputs that work just fine for monitoring or direct recording. However, if you want flexibility and creativity, investing in an interface with reamp capabilities could elevate your sound game. After all, who doesn’t love a little extra sonic fun? 🎸✨
How Do I Set up Reamping in My DAW?
To set up reamping in your DAW, you’ll first need to record a dry signal. Connect your audio source to your interface, and create a separate track for playback. Route this track’s output to the reamp device. Here’s the flow:
- Record your guitar or instrument on a track.
- Set output to reamp device.
- Connect reamp to amp or speakers.
- Hit play and enjoy the tone transformation! 🎸 Happy reamping!
What Cables Are Needed for Reamping?
To set up reamping, you’ll need a few key cables:
- Instrument Cable: Use a high-quality 1/4-inch cable to connect your guitar to the audio interface. This helps preserve clarity! 🎸
- TRS Cable: A 1/4-inch TRS cable connects the interface output to your reamp box.
- XLR Cable: You might need an XLR cable too, depending on your setup!
With the right cables, you’ll be reamping like a pro in no time!
Are Reamp Outputs Standard on All Audio Interfaces?
Nope, reamp outputs aren’t standard on all audio interfaces! 🎧 While some high-end models feature dedicated reamp outputs, many don’t. Typically, you’ll find this capability in interfaces designed for serious music production or recording. Check for a line-level output or a blend function, which can help. If you’re looking to reamp, it’s best to do some research, ensuring you get just the right gear for your sound adventure! 🚀